Most air and water intrusion is caused by gaps in the building, specifically the fenestrations. Window and door openings are the largest hole punches in your façade and present the largest opportunity for leaks. Therefore, building owners and facility managers must keep an eye on these areas as part of regular maintenance to repair and prevent damage to the glazing systems themselves and surrounding materials which keep them in place and watertight.
What to Look for:
In ongoing inspections of your building, you should look around the window perimeters and pay particular attention to the corners and sills, which are most prone to leaks. Here are the top items to examine:
- Water Damage
 Damp walls and leaking ceilings are obvious signs of moisture infiltration. From there, the challenge is determining the source of the intrusion, which can be identified via testing and examination of the elements below.
 - Sealants
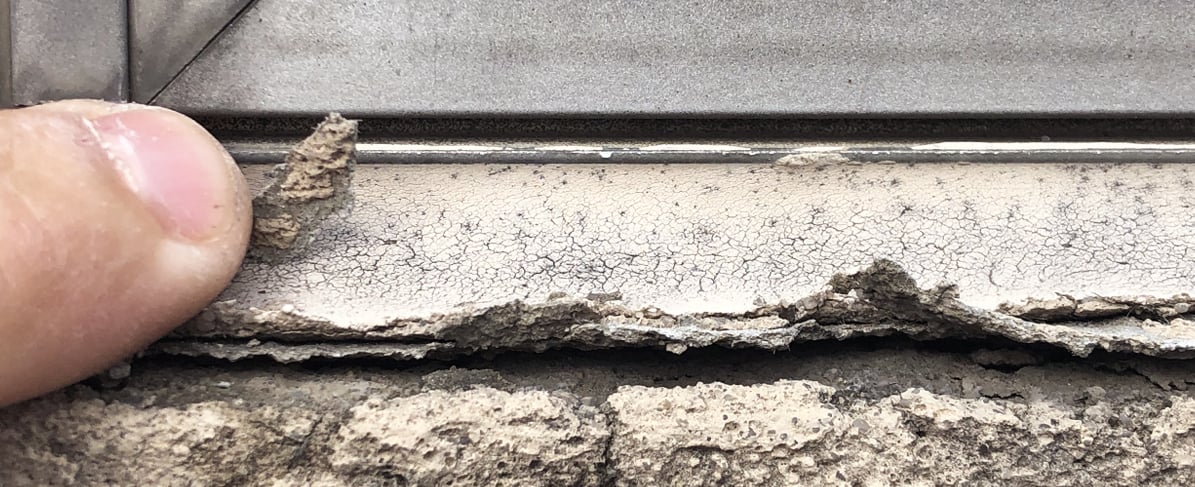
Sealants can fail by losing adhesion or deteriorating after years of natural building movement and exposure to the elements. Inspect the sealant beads surrounding all glazing systems from both the interior and exterior of the building. Cracks, rips, and voids in the sealant are signs that you need to repair or replace the sealant bead. Any spots missing sealant altogether will also require replacement. - Gaskets
Over time, rubber gaskets start to disengage, separate and/or lose their compression. Oils can also leach out, making gaskets dry and brittle. Look for chalky or cracked gaskets which are indicative that they are past their useful service life. Gaskets may also appear to be popping out, in which case you may be able to manually push them back in. If this process happens repeatedly, however, that may indicate a poorly sized or deteriorated gasket, which requires a replacement.
- Streaks
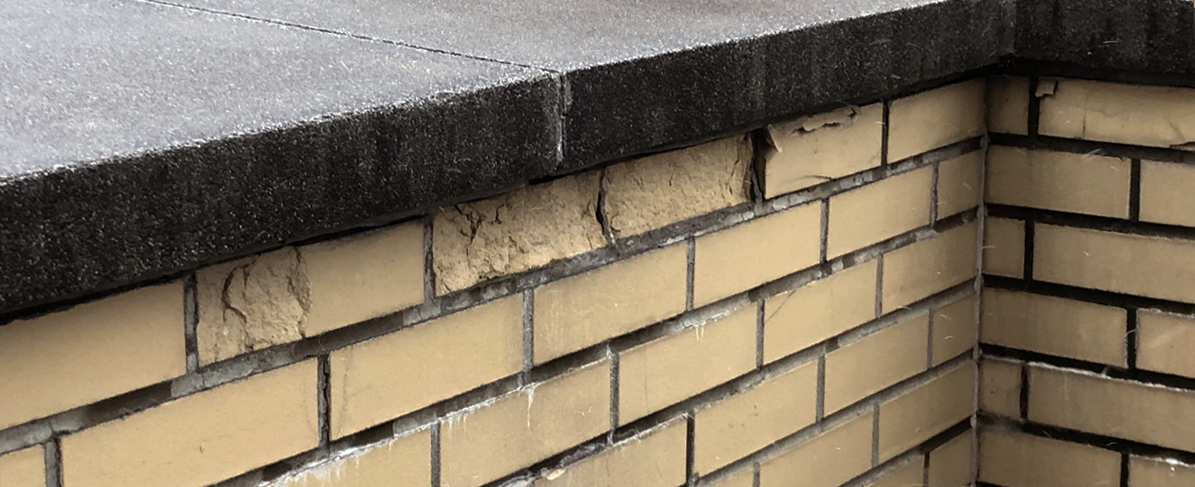
Dark streaks, also called rundown stains, on the outside of the building can occur from sealants that were not chemically compatible with the building substrate or the window frame material or gaskets. It can also be caused by oils leaching out of gaskets. Since this hints at problems with these building materials, you should evaluate the perimeter sealants and gaskets of the corresponding systems where streaking is evident for any damage.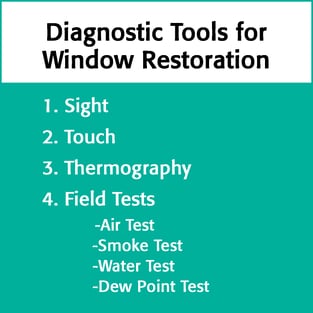
- Glass Movement
If you notice that glass in any of the glazing systems can move freely or upon touch, that is a sign for urgent repair. The glazing system itself and/or surrounding materials may need replacing to prevent water infiltration or complete separation from the wall system. - Fogging or condensation
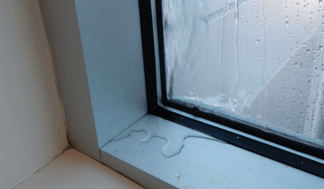
Fogging or condensation in your windows is likely due to a failure of the bond between the lites of glass that make up your insulated glass (IG) unit. Typical double and triple paned windows are sealed with an aluminum or silicone spacer with sealant applied overtop. Damage to these seals will require replacing the entire IG unit.
Diagnostic Tools:
As noted above, problems with a building’s window openings are usually visually apparent from both the interior and exterior of the building. Therefore, the first and most obvious diagnostic tool is sight. If visual inspection does not help you identify any issues, but you still suspect damage, there are additional investigative routes to better understand the scope, source, and extent of your issue.
- Touch
From the inside of the building, go to the windows where you suspect damage and trace around the corners and sill with your hands, working your way around the perimeter. It is normal to feel a temperature difference, but if you notice any air movement like a light breeze, then it is a sign that there is a gap in the system where air and moisture can enter the building. - Thermography
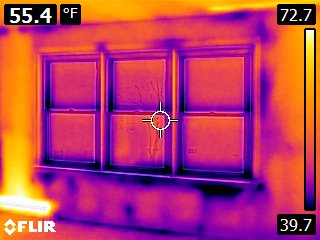
Thermography is a technique where a thermal camera takes photos of the exterior of a building and, using different colors, denotes the areas of temperature difference. These images can indicate areas of failure in the building envelope where the air-conditioned interior air is leaking outside. - Field Tests
There are several field tests that you can conduct to verify more specific locations of air and moisture infiltration. Air tests, like ASTM E783 "Standard Test Method for Field Measurement of Air Leakage Through Installed Exterior Windows and Doors", can be done on the jobsite to measure air leakage rates of installed exterior windows and doors. Similarly, smoke tests use small pens that emit smoke so you can more easily see the air movement as it gravitates towards any holes in the wall system.
Water tests operate similarly, using either smaller spray nozzles or entire spray racks to confirm areas of leakage. Reference ASTM E1105 or ASTM E331 for more detailed information on these field test methods.
Lastly, dew point testing, like ASTM E576 “Standard Test Method for Frost/Dew Point of Sealed Insulating Glass Units in the Vertical Position,” measures the degree of moisture in between lites of glass. Using these results, you can identify if there is a gap in the insulated glass unit that may require resealing or replacement.
Repair Options:
Depending on the cause of the window damage, you may need to conduct a wet seal repair, recaulk, replace gaskets, cover the system with an extruded silicone sheet or gasket overlay, or a combination of these methods. Work with a building envelope consultant, waterproofing specialist, or manufacturer to help identify the proper repair for your specific project. Here are the pros and cons of each method so you know what to expect:
- Wet seal repair or recaulk with silicone sealants
- Pros:
- Fast and affordable
- No occupant disruption
- When done properly, repairs could last 20+ years
- Pros:
-
- Cons:
- If done improperly, repair could last only 2-5 years
- Some silicone sealants are prone to dirt collection
- Specific removal and replacement sequence required for successful installation and performance
- Cons:
- Replacing gaskets
- Pros:
- Replacing a gasket with same material will have similar performance life as original gasket system
- Premium gasket materials available to improve performance life of glazing system
- Minimal, if any, occupant disruption
- Typically does not require the removal of the glass
- Fast and affordable
- Cons:
- Depending on root cause of the original gasket failure, it can be difficult to identify the proper replacement gasket. Make sure you work with a consultant or manufacturer that is skilled in providing custom gasket profiles. Watch this video to see how a Dallas high rise office building successfully replaced its gaskets with this method.
- Specific removal and replacement sequence required for successful installation and performance
- Requires samples of existing gasket for manufacturer evaluation
- Pros:
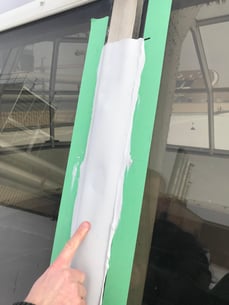 Silicone sheet and silicone gasket overlay applications
- Pros:
- Repair typically lasts 20+ years
- Fast and easy application
- No occupant disruption
- Fully encapsulates the damaged areas
- Minimal dirt pickup
- Can be customized for each individual project using 3D printing technology
- Cons:
- Could be more costly
- May require trial and error to find the right fit
- Could be more costly
- Pros:
- Window Replacement
- Pros:
- Removes any damaged components
- Replaces old materials with brand new ones
- Cons:
- Disrupts occupants during the window removal and replacement
- New materials and labor can be extremely costly
- Pros:
To prevent damage to the fenestrations and your building envelope, it is important to know what red flags to look for on your structure. From there, by using various diagnostic tools and understanding the repair options, you can find the right fit for your project and budget to maintain air- and watertight connections.